Sonntag, 30. November 2014

Pitfalls installing a GTX 970 on an Ubuntu 14.04 LTS system

If you are going to put a GTX 970 into a Ubuntu box running 14.04 LTS, you should update to nvidia driver 323 (if you don't mind running the proprietary driver) to take advantage of its features.

This driver is available via the ppa repository xorg/edgers.

However, skip that part, if you want to use its GPU in Blender.

For this you need CUDA 6.5, the new shiny package from nvidia - only 1 GB!

You can get it here. But be aware that there also is a CUDA 6.5 package without GTX 9xx support. So make sure that it says "with Support for GeForce GTX9xx GPUs" in the title.

Grab the DEB file and install it using.

sudo dpkg -i sudo dpkg -i cuda-repo-ubuntu1404-6-5-prod_6.5-19_amd64.deb

This will copy a handful of other DEB files to /var/cuda-repo-6-5-prod.

Import them into the package system with

sudo apt-get update

and install them in one go with

sudo apt-get install cuda

It contains the nvidia driver (343.19), the CUDA files and various other stuff.

After a reboot check the running version of the NVIDIA driver using the nvidia-settings utility. If the version is not 343.19, the nvidia driver hasn't been replaced (most likely because you were still using it). In this case you have to bring the system into a terminal-only mode.

The usual procedure is:
  • log-out
  • switch to a terminal (Ctrl-Alt-F1)
  • shut down the graphical login using: sudo service lightdm stop
    (depends on the Ubuntu flavour: lightdm for the vanilla version)
  • and proceed from there.

Disclaimer: Replacing a video driver is no fun if it fails and you end up without any GUI. Don't blame me.

The install will also take care of the initfs (needed during boot time).

In order to use the GTX 9xxx in Blender, you have currently use a development build from https://builder.blender.org/download/ as v 2.72 will fail, reporting an Unknown or unsupported CUDA architecture in the terminal.


All versions as of Nov. 28, 2014.

Donnerstag, 23. Oktober 2014

Accessing library materials, groups and other stuff via the Blender Python API

Information valid for Blender 2.72

The API documentation for the equivalent of the Link and Append command is a bit cryptic regarding what values to use for the parameters of this operator.  After some Googleing I found the solution in a few snippets of code here.

The main parameters of the Blender Python append command are:
  • filepath
  • filename
  • directory

The values of these parameters combine the file system path of the blend file and its "inner" structure.

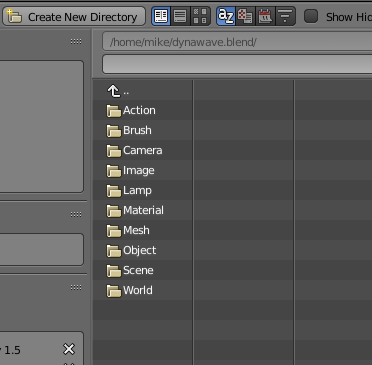
You can see this structure if you use the Link/Append command of the Blender GUI.  Once you click on the blend file its inner structure with materials, groups, objects etc. becomes visible.


In order to append for example the Material with the name white55 from a file named test.blend located in my home directory /home/mike, I have to use:

bpy.ops.wm.append(
   # // + name of blend file + \\Material\\
   filepath="//test.blend\\Material\\",

   # name of the material
   filename="white55",

   # file path of the blend file + name of the blend file + \\Material\\
   directory="/home/mike/test.blend\\Material\\", 
  
   # append, don't link
   link = False
)


Check the API entry for the other parameters.

This is an example from a Unix system, where the file path separator is a normal slash; on Windows systems you have to use a backslash.

However, the backslash is also the Python escape character, i.e. for one \ in the path name, you have to type \\

You can modify this example using \\Object\\ or \\Group\\ ...

Note: The operator append has recently (v2.71) been renamed.  It's earlier name was link_append.

This operator doesn't return an error code if the material, object etc. couldn't be loaded.  You have to be sure that it is present in the blend file.

You can iterate over the material names in a blend library file using the following snippet:

with bpy.data.libraries.load("/home/mike/test.blend") as (data_from, data_to):
   print(data_from.materials)


data_from.materials is a list of strings with the material names. The list is empty, if there aren't any materials available.

The command dir(data_from) returns
['actions', 'armatures', 'brushes', 'cameras', 'curves', 'fonts', 'grease_pencil', 'groups', 'images', 'ipos', 'lamps', 'lattices', 'linestyles', 'masks', 'materials', 'meshes', 'metaballs', 'movieclips', 'node_groups', 'objects', 'paint_curves', 'palettes', 'scenes', 'sounds', 'speakers', 'texts', 'textures', 'worlds']

Three guesses what data_from.groups or data_from.textures will return and how to modify the append command...

Freitag, 10. Oktober 2014

Updating Syncthing on a Synology DM1812+ (Part 2)

In a previous post I described a way to keep your Syncthing installation on a Synology DM1812+ up-to-date as the package from the Cytec repository lags significantly behind the current version.

This method is no longer feasible. The main reason is that the current builds of Syncthing have become dynamically linked, i.e. Syncthing uses certain libraries located on the host machine. If these are incompatible (like the ones on the Diskstation) strange things happen.

Until recently these libraries were part of the Syncthing binary. This so called statically linked binary had no external references and incompatible libraries on the host machine weren't a problem.

If you use the upgrade mechanism built-into Syncthing you get the dynamically linked version. This works with most machines, but not with the DM1812+.

You have to build a statically linked version yourself and replace the binary on Diskstation manually. Fortunately this isn't so hard.

If you haven't done so already, install Syncthing from the Cytek repository. This will copy all the other necessary scripts for the Syncthing integration onto the Diskstation, e.g. scripts to start and stop Syncthing via the Synology web GUI.

The following paragraphs describe how to compile Syncthing amd64 on a fresh Ubuntu LTS 14.04 amd64 machine. It mostly repeats the steps found here on the Syncthing site, but with additional information on how to get a statically linked binary.

The CPU running in the Diskstation is amd64 compatible, but it can also run 32 bit binaries. By tweaking the environment variable GOARCH, it should be possible to cross-compile it for other architectures. I haven't tried this.


Syncthing is written in Go. In order to compile Syncthing you first have to compile Go (also as statically linked version).

Prerequisites


You only need (apart from the source code) the Ubuntu packages for git and mercurial.

I suggest to install an additional packages: libc-bin. It contains the utility ldd which can be used to check if a binary is indeed not a dynamic executable.

$ sudo apt-get install git mercurial libc-bin

Compiling Go

First get the source code for the go language. Currently Syncthing requires Go 1.3, which can be found on the golang website. There you also find the source code for other versions and architectures, if needed.

Download it:

$ wget https://storage.googleapis.com/golang/go1.3.linux-amd64.tar.gz

The Go source code wants to live in /usr/local/go and Syncthing expects it there. You need root privileges to create this folder; then change permissions so that you have access to it as a normal user (in this example “mike” - change as required).

$ sudo mkdir -p /usr/local/go
$ sudo chown mike:mike /usr/local/go


Unpack the source into /usr/local/go

$ tar -C /usr/local -xzf go1.3.linux-amd64.tar.gz

Set the following environment variables

$ export PATH=$PATH:/usr/local/go/bin
$ export GOOS=linux
$ export GOARCH=amd64
$ export CGO_ENABLED=0


CGO_ENABLED=0 is responsible to get statically linked binaries.

Start compiling

$ cd /usr/local/go/src
$ ./all.bash


This can take a while.

Check if the resulting binary is indeed statically linked

$ ldd /usr/local/go/bin/go
    not a dynamic executable


(German message:  Das Programm ist nicht dynamisch gelinkt )

If you get something that looks like the following, the binary is dynamically linked

$ ldd /usr/local/go/bin/go
    linux-vdso.so.1 =>  (0x00007fff0ed31000)
    libpthread.so.0 => /lib/x86_64-linux-gnu/libpthread.so.0 (0x00007f4cf9726000)
    libc.so.6 => /lib/x86_64-linux-gnu/libc.so.6 (0x00007f4cf9360000)
    /lib64/ld-linux-x86-64.so.2 (0x00007f4cf9966000)


Do only continue if you have the statically linked version.

Check Go

$ go version
go version go1.3 linux/amd64


Compiling Syncthing


Create a directory for the syncthing source (the example shows its preferred location) and get the source:

$ mkdir -p ~/src/github.com/syncthing
$ cd ~/src/github.com/syncthing
$ git clone https://github.com/syncthing/syncthing


Compile it

$ cd syncthing
$ go run build.go


This doesn't take long.

Check it

$ cd bin
$ ldd syncthing
    not a dynamic executable


This is the statically linked binary we need.

This file has to be copied to the Diskstation. If you have installed it in its default location (volume1), the Syncthing binary is located at:

/volume1/@appstore/syncthing/bin/syncthing

Stop the Syncthing process via the Synology web GUI, rename the old one (just in case), and copy the new one to that location. Restart the process in the GUI.

You're good to sync.
Sonntag, 14. September 2014

Blender: Change Cycles render seed automatically

Here is a small Blender add-on to change the seed value for the Cycles render engine automatically before rendering a frame.

The seed value determines the noise pattern of a cycles render.

If you only render one image, this is of no concern for you.

If you render an animation, you get the same pattern for each frame which is very obvious for the viewer.

To counter this, you can enter #frame as seed value (creating a so called driver) which returns the frame number as seed value. This gives you a different noise pattern per frame which makes it look like film grain.

This obviously only works if you have an animation to render, but not with a single frame.

After installing the add-on you see an additional checkbox in the render samplig panel where you can switch this feature on or off.


Why to go the trouble to write an add-on for this?

Lately I have used image stacking a lot.

This technique allows you to reduce noise in pictures created by Cycles rendering engine by rendering the same frame multiple times - provided you change the render seed. You then can calculate the "average" of these pictures (e.g. using ImageMagick) cancelling out some noise.

If you want to a clearer version of an image that has just rendered over an hour, you save it and render it again, then stack the images. This is much faster than scrapping the first image and re-rendering it with a larger sample count.

After forgetting to change the seed value a couple of times, the level of suffering was high enough to make an add-on. :-)


Dienstag, 9. September 2014

How to "average" PNG files with ImageMagick

In a recent post on CgCookie Kent Trammell explained that you can improve the quality of a Cycles render by rendering the image multiple times if you use a different value for the sampling seed.


In his case those images were calculated by different computers of his render farm.

But the same is true, if you waited for an hour for a render to finish, and you are pleased with the image except for the noise.  In this case save the image, change the seed value and render it again.  This way the first hour was not in vain.

In any case you will end up with one or more PNG files with look similar except for the noise pattern which changes with the seed value.

If you calculate the mean image of these images the noise level will be reduced.

Kent Trammell showed how this calculation can be achieved with the Blender node editor (his math was a bit off, but the principle is sound).

The same could be accomplished with other programs like Photoshop or The Gimp or command line tools like ImageMagick.

The ImageMagick command for doing this is:

convert image1 image2 image3 -evaluate-sequence mean result

However, if you try this with PNG files that contain an alpha channel (RGBA) the result is a totally transparent image. 

In this case use the option "-alpha off", e.g. like this:

convert render*.png -alpha off -evaluate-sequence mean result.png

A final note: Keep in mind that all images will be loaded into memory during this process - i.e. you want to limit the number of images.

Donnerstag, 26. Juni 2014

Updating Syncthing on a Synology DM1812+

Syncthing is a secure directory syncing tool still in its early development stages which runs on various platforms like Linux, Windows, Mac, BSD and Solaris. There are already ports for Android and the Synology NAS.


How to install Syncthing on a Synology Diskstation

Disclaimer: These instructions were only tested on a DM1812+ with DSM 4.0. Your mileage may vary.

Open the Package Center and add under Settings the following Package Source

http://cytec.us/spk/

Click Refresh

You'll find the Syncthing package under "Other Sources" from which it can install it as usual.


You can control Syncthing via its web interface on

http://your_diskstation_ip:7070

That's it... You find instructions on how to operate Syncthing here.

Updating Synthing

[Update Oct. 10, 2014]: This part has been superseded by this post.

Usually you would update the Syncthing package via the Package Center.

Currently (mid 2014) there are frequent updates to Syncthing which the cytek repository does not track.

Fortunately, the Synthing binary (the part that actually implements the syncthing server/client) can update itself by starting it with the -upgrade option from the command line.

However, this fails on the Diskstation with the error message

FATAL: Get https://api.github.com/repos/calmh/syncthing/releases?per_page=1: x509: failed to load system roots and no roots provided

The reason for this is that there are no ssl certificates present on the Diskstation.
On a Linux system these can be found in /etc/ssl/certs and usually end with .pem

On the Diskstation this directory is missing.

To fix this, copy the content from the Linux directory /etc/ssl/certs to a directory on the Diskstation and create a link with the name certs to this directory in /etc/ssl.

The following examples assumes:
  • your Syncthing app is installed on volume1 (determined during install)
  • you have created a shared folder on volume1 named mydata which is accessible by you
  • you've copied the certificates into a folder named linuxcerts in the just mentioned shared folder
I.e. change the path names according to your setup.

log into your Diskstation via ssh as root

mkdir -p /etc/ssl
cd /etc/ssl
ln -s /volume1/mydata/linuxcerts certs


Please note:
These certificates will not be updated automatically and they will eventually expire. So you have to refresh them from time to time manually.

And the place I choose is perhaps not the most secure one; but I'm the only one using my Diskstation. Move them somewhere else, if you want.

To upgrade the binary

  • First stop the service via the package center.
  • ssh into your box.
  • Upgrade Syncthing manually on the command line using
cd /volume1/@appstore/syncthing/bin
./syncthing -upgrade


  • Now start the service again from the package center.