Posts mit dem Label blender werden angezeigt. Alle Posts anzeigen

Donnerstag, 6. Februar 2020

How to set the active camera ... when Blender renders in the background


Background rendering, i.e. rendering without the UI and based on command line parameters alone, is usually the domain of render farms.

But there are situations where this functionality is useful for normal users as well: scripts.

In my case the blend file contains a complex architectural model and various cameras (which you can conveniently set-up and switch between with the “Stored Views” add-on).

Some of those cameras are (virtual) panoramic cameras.  Their output will be fed into a generator script to calculate multi-res images for use with the web panorama viewer pannellum (https://pannellum.org) to create a virtual tour.

Wouldn’t it be nice to have a script producing the rendered pictures for all those cameras; it might even call the pannellum generator script afterwards to calculate the multi-res images needed for the virtual tour...

When Blender is started in background mode, various parameters can be set from the command line - among others the frame and scene to be rendered, the render engine and the output path.

Missing however are some settings I would like for my workflow: the active camera and the dimension percentage (Output Properties > Dimensions > Resolution > %). Those values are stored in the blend file and used in the render process.

If you want rendered images from multiple cameras you usually open the blend file, switch the camera, save the blend file and re-render…

As for the other setting: I sometimes forget to switch the resolution from my usual 50% to 100% before starting to render. While rendering without the UI you don’t notice this right away.  Something that sets this value to 100% would be nice.

The solution

Blender’s command line option --python-expr lets you enter a short Python snippet which gives you access to all settings in your scene.

To switch the active camera in the current screen use

import bpy
bpy.context.scene.camera = bpy.context.scene.objects.get('XXXXXX')


where XXXXXX is the name of the camera.

The command for setting the resolution percentage value is

bpy.context.scene.render.resolution_percentage = 100

You can test these commands in Blender’s Python console.

Note: It does matter where you put the --python-expr command on the command line. If used at the end of the command it will be ineffective because it changes the parameter after the render process.

My typical Blender background render command looks like this:

blender -b myblend.blend --python-expr "import bpy; bpy.context.scene.camera = bpy.context.scene.objects.get('Camera XXXX'); bpy.context.scene.render.resolution_percentage = 100" -o /tmp/pic_#### -F PNG -x 1 -f 1 -E CYCLES

  • -b: background render of myblend.blend.
  • --python-expr: use camera ‘Camera XXXX’ and render at 100%
  • -o: store under /tmp/pic_####
  • -F: store as PNG
  • -x: add the PNG extension
  • -f: render frame 1
  • -E: use cycles render engine

You might use this technique to change other values on the fly without them being saved back to disk.

Sonntag, 30. November 2014

Pitfalls installing a GTX 970 on an Ubuntu 14.04 LTS system

If you are going to put a GTX 970 into a Ubuntu box running 14.04 LTS, you should update to nvidia driver 323 (if you don't mind running the proprietary driver) to take advantage of its features.

This driver is available via the ppa repository xorg/edgers.

However, skip that part, if you want to use its GPU in Blender.

For this you need CUDA 6.5, the new shiny package from nvidia - only 1 GB!

You can get it here. But be aware that there also is a CUDA 6.5 package without GTX 9xx support. So make sure that it says "with Support for GeForce GTX9xx GPUs" in the title.

Grab the DEB file and install it using.

sudo dpkg -i sudo dpkg -i cuda-repo-ubuntu1404-6-5-prod_6.5-19_amd64.deb

This will copy a handful of other DEB files to /var/cuda-repo-6-5-prod.

Import them into the package system with

sudo apt-get update

and install them in one go with

sudo apt-get install cuda

It contains the nvidia driver (343.19), the CUDA files and various other stuff.

After a reboot check the running version of the NVIDIA driver using the nvidia-settings utility. If the version is not 343.19, the nvidia driver hasn't been replaced (most likely because you were still using it). In this case you have to bring the system into a terminal-only mode.

The usual procedure is:
  • log-out
  • switch to a terminal (Ctrl-Alt-F1)
  • shut down the graphical login using: sudo service lightdm stop
    (depends on the Ubuntu flavour: lightdm for the vanilla version)
  • and proceed from there.

Disclaimer: Replacing a video driver is no fun if it fails and you end up without any GUI. Don't blame me.

The install will also take care of the initfs (needed during boot time).

In order to use the GTX 9xxx in Blender, you have currently use a development build from https://builder.blender.org/download/ as v 2.72 will fail, reporting an Unknown or unsupported CUDA architecture in the terminal.


All versions as of Nov. 28, 2014.

Donnerstag, 23. Oktober 2014

Accessing library materials, groups and other stuff via the Blender Python API

Information valid for Blender 2.72

The API documentation for the equivalent of the Link and Append command is a bit cryptic regarding what values to use for the parameters of this operator.  After some Googleing I found the solution in a few snippets of code here.

The main parameters of the Blender Python append command are:
  • filepath
  • filename
  • directory

The values of these parameters combine the file system path of the blend file and its "inner" structure.

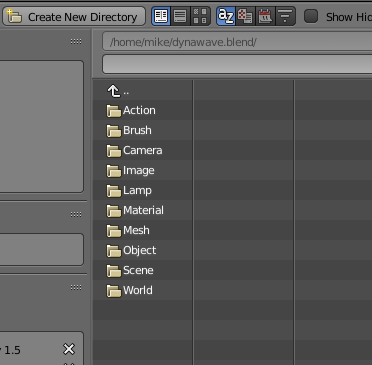
You can see this structure if you use the Link/Append command of the Blender GUI.  Once you click on the blend file its inner structure with materials, groups, objects etc. becomes visible.


In order to append for example the Material with the name white55 from a file named test.blend located in my home directory /home/mike, I have to use:

bpy.ops.wm.append(
   # // + name of blend file + \\Material\\
   filepath="//test.blend\\Material\\",

   # name of the material
   filename="white55",

   # file path of the blend file + name of the blend file + \\Material\\
   directory="/home/mike/test.blend\\Material\\", 
  
   # append, don't link
   link = False
)


Check the API entry for the other parameters.

This is an example from a Unix system, where the file path separator is a normal slash; on Windows systems you have to use a backslash.

However, the backslash is also the Python escape character, i.e. for one \ in the path name, you have to type \\

You can modify this example using \\Object\\ or \\Group\\ ...

Note: The operator append has recently (v2.71) been renamed.  It's earlier name was link_append.

This operator doesn't return an error code if the material, object etc. couldn't be loaded.  You have to be sure that it is present in the blend file.

You can iterate over the material names in a blend library file using the following snippet:

with bpy.data.libraries.load("/home/mike/test.blend") as (data_from, data_to):
   print(data_from.materials)


data_from.materials is a list of strings with the material names. The list is empty, if there aren't any materials available.

The command dir(data_from) returns
['actions', 'armatures', 'brushes', 'cameras', 'curves', 'fonts', 'grease_pencil', 'groups', 'images', 'ipos', 'lamps', 'lattices', 'linestyles', 'masks', 'materials', 'meshes', 'metaballs', 'movieclips', 'node_groups', 'objects', 'paint_curves', 'palettes', 'scenes', 'sounds', 'speakers', 'texts', 'textures', 'worlds']

Three guesses what data_from.groups or data_from.textures will return and how to modify the append command...

Sonntag, 14. September 2014

Blender: Change Cycles render seed automatically

Here is a small Blender add-on to change the seed value for the Cycles render engine automatically before rendering a frame.

The seed value determines the noise pattern of a cycles render.

If you only render one image, this is of no concern for you.

If you render an animation, you get the same pattern for each frame which is very obvious for the viewer.

To counter this, you can enter #frame as seed value (creating a so called driver) which returns the frame number as seed value. This gives you a different noise pattern per frame which makes it look like film grain.

This obviously only works if you have an animation to render, but not with a single frame.

After installing the add-on you see an additional checkbox in the render samplig panel where you can switch this feature on or off.


Why to go the trouble to write an add-on for this?

Lately I have used image stacking a lot.

This technique allows you to reduce noise in pictures created by Cycles rendering engine by rendering the same frame multiple times - provided you change the render seed. You then can calculate the "average" of these pictures (e.g. using ImageMagick) cancelling out some noise.

If you want to a clearer version of an image that has just rendered over an hour, you save it and render it again, then stack the images. This is much faster than scrapping the first image and re-rendering it with a larger sample count.

After forgetting to change the seed value a couple of times, the level of suffering was high enough to make an add-on. :-)


Dienstag, 9. September 2014

How to "average" PNG files with ImageMagick

In a recent post on CgCookie Kent Trammell explained that you can improve the quality of a Cycles render by rendering the image multiple times if you use a different value for the sampling seed.


In his case those images were calculated by different computers of his render farm.

But the same is true, if you waited for an hour for a render to finish, and you are pleased with the image except for the noise.  In this case save the image, change the seed value and render it again.  This way the first hour was not in vain.

In any case you will end up with one or more PNG files with look similar except for the noise pattern which changes with the seed value.

If you calculate the mean image of these images the noise level will be reduced.

Kent Trammell showed how this calculation can be achieved with the Blender node editor (his math was a bit off, but the principle is sound).

The same could be accomplished with other programs like Photoshop or The Gimp or command line tools like ImageMagick.

The ImageMagick command for doing this is:

convert image1 image2 image3 -evaluate-sequence mean result

However, if you try this with PNG files that contain an alpha channel (RGBA) the result is a totally transparent image. 

In this case use the option "-alpha off", e.g. like this:

convert render*.png -alpha off -evaluate-sequence mean result.png

A final note: Keep in mind that all images will be loaded into memory during this process - i.e. you want to limit the number of images.

Donnerstag, 29. März 2012

Current versions of blender under Ubuntu

The normal way to stay current with your blender version is to download it from 
http://www.graphicall.org/

You can use the following commands to get it using the normal Ubuntu updates via ppa:

sudo add-apt-repository ppa:cheleb/blender-svn
sudo apt-get update
sudo apt-get install blender

Mittwoch, 20. Oktober 2010

ColorCube on a 64 bit machine


After a recent interview with Quentin Bolsee, the lead developer of the game ColorCube, I  downloaded the demo version of his game.  ColorCube is a simple nice puzzle game that can keep you occupied for hours.

But I had to find out that the program did not start on my main machine.

The command

ldd Launcher

quickly revealed that it a 32 bit application, and various libraries were missing on my 64 bit system.

The package ia32-libs which provide 32 libraries for 64 bit systems does understandably not contain all libraries that may be installed on a 32 bit system.  A simple work-around is to copy these files from a 32 bit set-up (/usr/lib) to the 64 bit system (/usr/lib32).

Don't forget to set the file owner to root on the target system., and keep in mind that those libraries will not be updated.

In order go get ColorCube running, I needed to copy the following libraries:

libHalf.so.6
libIlmImf.so.6
libIlmThread.so.6
libspeex.so.1
libtheora.so.0
libIex.so.6
libImath.so.6
libraw1394.so.11
libusb-1.0.so.0


Happy gaming...


Mittwoch, 19. Mai 2010

The wow factor book

Yesterday, a young man in Australia became victim of his own success.

Andrew Price of blenderguru.com fame had demonstrated in the past that he can produce good and easy to understand blender text and video tutorials.

He peaked the community's interest when he announced an e-book -  “the wow-factor” - about the compositor of Blender 2.5, something that hasn't got a lot of coverage so far.

During the last weeks he released a sample chapter of his book and produced a promotional video worthy of a shopping channel.  Apart from detailing the content of the e-book, it listed all the bonuses which come with it, and culminated in the display of the e-book itself and all the bonuses as CDs and booklets which, of course, all exist - in good Blender fashion - only virtually.

One day before the release he offered a chance to win a free copy of the e-book.  It got 700+ entries which should have been a warning about what was going to hit him.

With only a few hours to go, his website become slower and slower, and when the first message "error 500" appeared, it was clear that the demand crashed his server.  The move to a more powerful home took another 3+ hours which deprived a few of his costumers of the chance to be among the first hundred buyers eligible for “the vault” - the collection of source material which made up the book.

Before going to bed myself, I skimmed the e-book.  It delivers what was promised: an overview of glares, blurs and optical effects - many of which most of us have never heard of - and how to create them in Blender. 

The bonuses provide additional information which are not available in this completeness at this time anywhere else.  The “node encyclopaedia”  for example will save you hours of gathering this information and will hopefully become part of the regular Blender documentation once the final 2.5 version is released, which can still take some time.

The reason that the compositor is not the most prominent feature in most other Blender tutorials is, that it is one of the last steps of creating something in Blender used to polish your render.  This means that you must already have something to work with – a fact that has been taken care of by two video tutorials showing how to build a scene in which to use the effects.  Unfortunately they are only available in a time limited fashion.

All in all it seems to provide a lot of useful information which I can hopefully learn during the coming weeks while reading, watching and listening to the provided material.

I wonder if there were free bonus steak knives mentioned in the commercial... .blend files would suffice. :-)

Samstag, 20. Februar 2010

Blender 2.5 alpha 1 verfügbar


Seit heute ist Blender 2.5 alpha 1 verfügbar.

Dieses offizielle Release läuft auch unter Ubuntu Hardy - der (noch) aktuellen LTS-Version von Ubuntu.

Bei den aktuelleren Blender Builds auf GraphicAll.org war das seit dem Übergang von Alpha 0 auf Alpha 1 leider nicht mehr der Fall.

Donnerstag, 10. Dezember 2009

Blender 2.5 alpha, slow screen update


Now that I got Blender 2.5 alpha 0 running on my old laptop, I noticed that when rotating what must be the most deleted cube in the 3D world, the refresh rate was very slow. An update rate of 2 or 3 times per second makes the program unusable.

Granted, the laptop is not very fast, but in the old version of Blender (2.49a) the cube followed the mouse movement without any visible delay.

Having seen Blender using OpenGL without hardware acceleration before, I tried pressing one of the OpenGL buttons down in the "header" of the 3D window:


This produced the error: "Failed to create OpenGL offscreen buffer".


Something was wrong with the use of OpenGL.

User teeth in the developer IRC channel #blendercoders on freenet.org, suggested to change the user preferences from "Triple Buffer" to "Overlap".


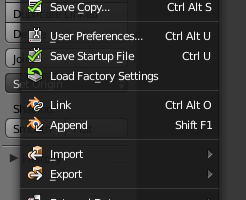
You can display these settings using "File - User Preferences" or Ctrl-Alt-U. Then select "System" and look for the "Window draw method".

Don't forget to "Save as default".

It worked here. If you have the same problem, it's worth a try.

Dienstag, 1. Dezember 2009

Bisecting mesa - bug 446632


Bug 446632 is responsible for the segfaulting blender on start-up on machines with ATI graphics cards running Ubuntu Karmic.

Analysis showed that the segfault originated in the mesa library. The code of the mesa contains the OpenGL implementation under Linux, and is used by Blender and various other programs.

During the pre-release process of Karmic, various builds of the mesa package have been made and are still available online. Tests showed that the last build without the bug was 7.6.0~git20090817.7c422387-0ubuntu8. The next one was 7.6.0-1ubuntu1.

To determine which patch between those two releases is responsible for the bug, a process called git-bisecting is used. For this, you give git the id of a version with and without the bug. Git chooses a version in the middle. You check it out, compile it and test it. After that you tell git if this version was good or bad. After that git chooses another version halfway between the last good and the first bad one. This process is repeated until you find the bad commit.

Sounds simple enough.... but it raises the following questions:
  • What Git repository does Ubuntu use for the mesa package?
  • Which commits correspond to the above mentioned builds?
  • And once you have the source, how do you compile, package and use it?
Within the Ubuntu project there is no git repository that describes the way from 7.6.0~git20090817.7c422387-0ubuntu8 to 7.6.0-1ubuntu1. Therefore we use the upstream git repository at git://anongit.freedesktop.org/mesa/mesa (browseable: http://cgit.freedesktop.org/mesa/mesa) on which the Ubuntu version is based.

7c422387 is the commit id within the freedesktop repository (well, not quite. The real commit ID is 7c4223876b4f8a78335687c7fcd7448b5a83ad10, but the first few digits are usually sufficient to find it).

The last commit of the 7.6.0 branch in this repository has the label mesa_7_6

The way to compile the source is described later in this post. As you will see, packaging is not necessary. The compiled drivers can be used directly.

"Git"ting started

You need git-core - and also download gitk (which is not really necessary, but makes a nice graphical representation).

sudo apt-get install git-core gitk
choose a directory and download the entire repository (in this tutorial I use my home directory).

cd ~
git clone git://anongit.freedesktop.org/mesa/mesa

This will create the subdirectory mesa, and a subdirectory .git, that contains the content of the cloned repository.

Be patient. After counting the elements to be transferred it takes some time before the actual download begins. All in all around 100 MB.

The code that we are going to compile needs some additional source files:

sudo apt-get build-dep mesa
sudo apt-get install libx11-dev libxt-dev libxmu-dev libxi-dev


Further preparations

make clean
./autogen.sh
./configure --prefix=/usr --mandir=\${prefix}/share/man \
--infodir=\${prefix}/share/info --sysconfdir=/etc \
--localstatedir=/var --build=i486-linux-gnu --disable-gallium --with-driver=dri \
--with-dri-drivers="r200 r300 radeon" --with-demos=xdemos --libdir=/usr/lib/glx \
--with-dri-driverdir=/usr/lib/dri --enable-glx-tls --enable-driglx-direct --disable-egl \
--disable-glu --disable-glut --disable-glw CFLAGS="-Wall -g -O2"
make clean removes the "debris" from previous compilations. But we haven't created any yet... Do it anyway - it's good practice :-)

./autogen.sh verifies that all prerequisites are met. If anything is missing, it will complain.

./configure sets up what is compiled, where and how.

During the tests remove -O2 (under CFLAGS). This disables compiler optimisations. The resulting code is a bit larger and a little bit slower, but it is easier to use during debugging.

--with-dri-drivers="..." determines which drivers are compiled. As the original bug only affects ATI machines, we only need the drivers we use. That saves a lot of compile time. If yours is not among them, check out ~/mesa/src/mesa/drivers/dri/ and add it.

You can find out which driver you are using with:
xdriinfo driver 0

Verify the good build

We know that build 7c4223876b4f8a78335687c7fcd7448b5a83ad10 still works with Blender. So let's check it out, compile it and test it. If Blender does not crash, we know that the process so far is working correctly.

git checkout 7c422387
make

We could enter the entire ID, but the first few digits are usually sufficient.

make should finish without errors. Now we start Blender using:

LD_LIBRARY_PATH="~/mesa/glx" LIBGL_DRIVERS_PATH="~/mesa/src/mesa/drivers/dri/radeon" Blender

LD_LIBRARY_PATH and LIBGL_DRIVERS_PATH make Blender (and only Blender, or any other program you specify) use the just compiled libraries. No need to reboot or to restart X. No effects to the remaining programs.

Please note, that you may need to replace the radeon part of the driver path with r200 or r300 depending on the driver you use.

Blender should run correctly.

Bisecting

We now officially start the bisecting process:
git bisect start
... and tell git that this was a "good" build.
git bisect good


Checking out the bad build

As we can not pinpoint which git version corresponds to first bad Ubuntu build (7.6.0-1ubuntu1) we simply start at the newest commit in the mesa_7_6 branch:
git checkout mesa_7_6

This replaces the files in the mesa directories and its subdirectories (except .git) with the new ones.

We compile it:
make
and test it:
LD_LIBRARY_PATH="~/mesa/glx" LIBGL_DRIVERS_PATH="~/mesa/src/mesa/drivers/dri/radeon" Blender

This time Blender should crash. We notify git:
git bisect bad

With this command, git chooses a commit approx. in the middle:
Bisecting: 482 revisions left to test after this (roughly 9 steps)
[ee066eaf6d0dd3c771dc3e37390f3665e747af2a] llvmpipe: Allow to dump the disassembly byte code.

The make, test, bisect process is repeated until git displays the first bad commit.

bfbad4fbb7420d3b5e8761c08d197574bfcd44b2 is first bad commit
commit bfbad4fbb7420d3b5e8761c08d197574bfcd44b2
Author: Pauli Nieminen
Date: Fri Aug 28 04:58:50 2009 +0300
r100/r200: Share PolygonStripple code.
:040000 040000 1b1f09ef26e217307a5768bb9806072dc50f2a14 eb20bf89c37b2f59ce2c243b361587918d3c9021 M src

As an interesting side note, the driver from this commit does crash Blender, but not with a segfault. There is even an output on the console: "drmRadeonCmdBuffer: -22".

The next commit in this branch 4322181e6a07ecb8891c2d1ada74fd48c996a8fc makes Blender crash the way we have come to know.

The previous commit (e541845959761e9f47d14ade6b58a32db04ef7e4) would be a good candidate to keep Blender running until mesa is fixed:

git checkout e541845959761e9f47d14ade6b58a32db04ef7e4
make
LD_LIBRARY_PATH="~/mesa/glx" LIBGL_DRIVERS_PATH="~/mesa/src/mesa/drivers/dri/radeon" Blender

Ackowledgements
Tormod Volden for creating and updating https://wiki.ubuntu.com/X/BisectingMesa and various other info.

References
https://bugs.launchpad.net/ubuntu/+source/mesa/+bug/446632
http://bugs.freedesktop.org/show_bug.cgi?id=25354
https://wiki.ubuntu.com/X/Bisecting
https://wiki.ubuntu.com/X/BisectingMesa
https://launchpad.net/~xorg-edgers/+archive/ppa
http://www.kernel.org/pub/software/scm/git/docs/user-manual.html
http://cgit.freedesktop.org/mesa/mesa
Montag, 30. November 2009

Update zum "Blender"-Bug

Bei den Abstürzen von Blender unter Ubuntu Karmic scheint es sich nicht um einen Fehler in Blender zu handeln, sondern um einen Bug im Paket mesa, das für die OpenGL-Implementierung unter Linux zuständig ist.

Der Bug-Report ist unterdessen upstream gemeldet.

Freitag, 27. November 2009

Blender-Absturz in Karmic

Blender 2.5 Alpha 0 ist gerade erschienen, und dass dies nicht auf Anhieb funktioniert erwartet man fast.

Dass allerdings die ältere Version von Blender (2.49a) aus den Ubuntu-Repositories nicht funktioniert, ist dann schon ärgerlicher, zumal sich wahrscheinlich das nächste halbe Jahr nichts daran ändern wird.

Blender stürzt nach dem Aufruf mit einem Segfault ab.

Probleme scheinen mal wieder nur die ATI-Karten zu haben.

Bug-Report in Ubuntu's Launchpad